
Are you getting very bad audio recordings because of the background noise? Are your podcasts or music recordings not upto the mark because of the disturbances outside your apartment or studio? Then in this article we are going to show you a complete fix to this problem.
Most of the Video Editing applications like iMovie include a feature which allows you to reduce noise but they are not upto the mark as it does suppress the noise but also reduces the overall audio quality. This is when its time to do a detailed check on the audio file by hearing all the hiss, hum, buzz etc and then removing the only noise which you would like to remove which probably is kind of constant in nature.
Video Tutorial on this Fix :
Download Audacity
First off you need to download a free application called as “Audacity” based on your computer i.e. Windows, Linux or Mac. Install the software and following this you would get the following interface where you need to Import the Audio file. Download Link

Import or Record Audio
If you don’t have the audio file, you need to import the video file and then just export the audio file in Mp3 or Wav format and then import the same in Audacity application. If you do not have the same recorded then you can use Audacity to record the audio itself. In the top there is a option to select the Microphone which you need to select and Increase the “Input Volume” to almost 80%.

Zoomin & Select Noise
Once you import the audio file you would see waveforms on the track which are generally vertical lines and the higher they are would resemble audio or noise while the flat sections would mean that its quiet at that moment. You need to zoom in by View > Zoom In, following which you need to find the area in the track where there is no deliberate sound. This selected moment would have the noise which was recorded by the microphone, while your own voice was not recorded at that moment.

Noise Removal
Now that you have selected the sample of audio where there is disturbance which is constant, its time to implement the “Noise Removal” feature. Click on the Top Menu Effect > Noise Removal option.

Here select the option of “Get Noise Profile” which would make audacity know that this is the selected audio sample which has to be filtered out.
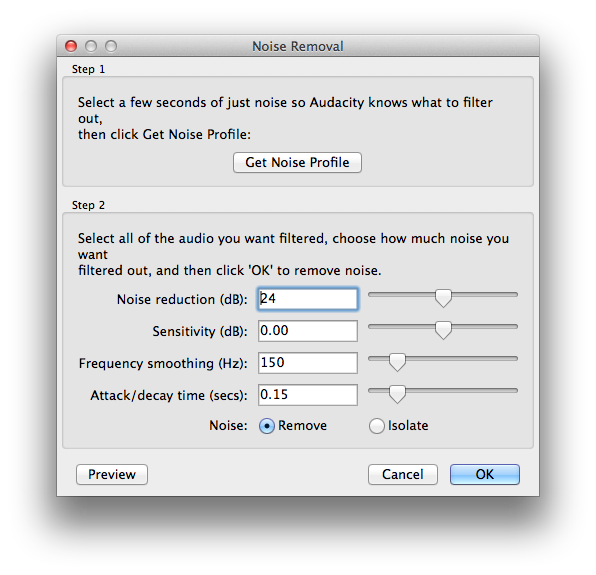
Now that the audio is profiles, you need to select the complete audio / track file by pressing Ctrl+A on your keyboard. Next select the same options from the Menu Effect > Noise Removal and then just click on OK, following which within a few seconds the whole audio file will be cleaned by removing the selected sample audio making it perfectly noise free track. You can redo the same process if you find more disturbances like background noise in your audio tracks.